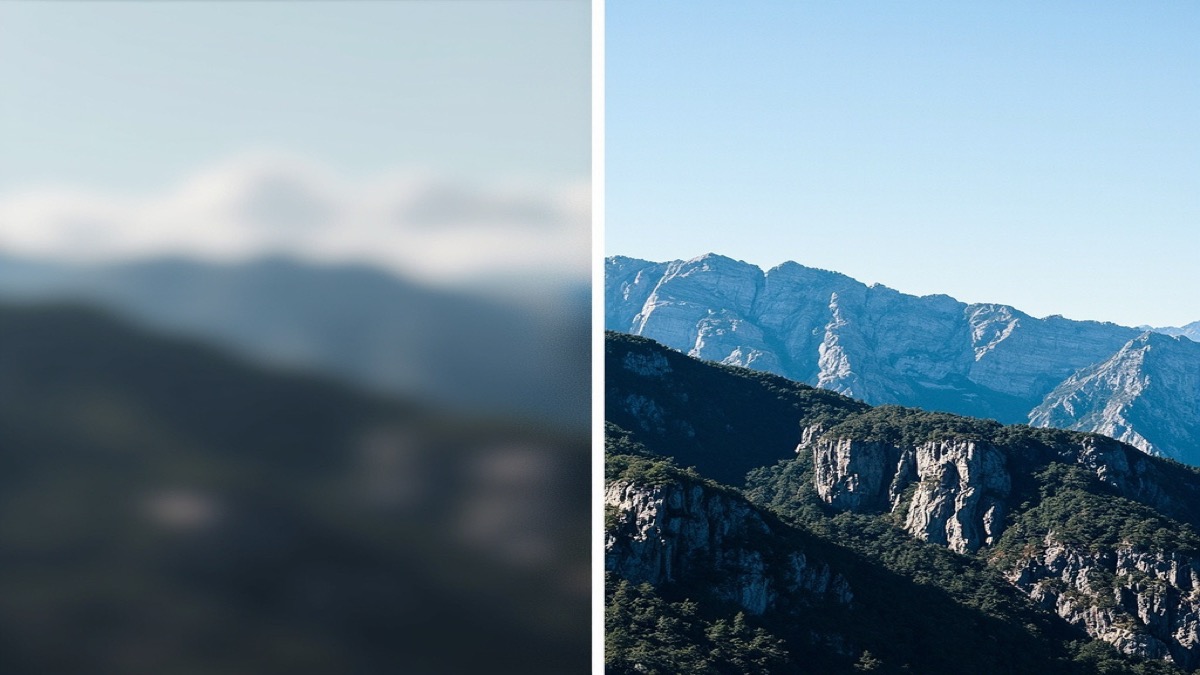
How to Upscale an Image Without Losing Quality
For most images, Upscayl is the best free option — it uses AI models to add detail without artifacts. For professional photo restoration, Topaz Gigapixel gives the highest quality but costs $29/month. For batch processing and online use, LetsEnhance offers 10 free credits on signup. Before upscaling, keep the highest-quality original and decide the final use, dimensions, and acceptable artifact level. A 2x web image, a print file, and an illustration may need different models and output formats.
Step-by-step
Choose the right upscaling tool for your image type
Different tools excel at different content. For photos and portraits, Topaz Gigapixel leads in quality with specialized AI models. For illustrations and anime-style art, waifu2x was designed for exactly this. For a free all-purpose option that handles both well, Upscayl uses multiple AI models and runs locally on your computer. Keep the original beside the upscale and judge the result at 100% zoom and at the final display size. Record the model, scale, format, and any artifact decision so the export can be repeated or rolled back.
Start with the highest quality original you have
AI upscaling cannot create detail that was never in the source image. It can intelligently interpolate edges and add plausible texture, but starting with a sharp, well-exposed, in-focus photo always produces better results. Avoid upscaling from already-compressed JPEGs — the compression artifacts get amplified and become more visible at higher resolutions. Keep the original beside the upscale and judge the result at 100% zoom and at the final display size. Record the model, scale, format, and any artifact decision so the export can be repeated or rolled back.
Pick the right scale factor (2x, 4x, or higher)
Most tools default to 2x upscaling, which doubles dimensions and roughly quadruples pixel count. This is the safest setting for most images. Going to 4x or higher introduces more opportunities for AI hallucination — adding detail that wasn't there. Use 4x only when you genuinely need the extra resolution (large prints, heavy cropping recovery). For online sharing and most uses, 2x is enough. Keep the original beside the upscale and judge the result at 100% zoom and at the final display size. Record the model, scale, format, and any artifact decision so the export can be repeated or rolled back.
Run the AI upscaler and preview the result
Open your chosen tool and drag your image in. Upscayl lets you select from multiple AI models — 'Real-ESRGAN' for photos, 'Ultrasharp' for general use, 'Digital Art' for illustrations. Processing takes 10-60 seconds for a typical 2x upscale depending on your hardware. Preview at 100% zoom to check for artifacts before exporting. Keep the original beside the upscale and judge the result at 100% zoom and at the final display size. Record the model, scale, format, and any artifact decision so the export can be repeated or rolled back.
Compare against the original at 100% zoom
Open both the original and upscaled image side by side and zoom into sharp details — eyes in portraits, hair strands, text edges, fabric textures. Look for: oversharpening (halos around edges), plastic-looking skin, repeated patterns (a telltale AI artifact), and overly smooth gradients. If you see any of these, try a different AI model or reduce the scale factor. Keep the original beside the upscale and judge the result at 100% zoom and at the final display size. Record the model, scale, format, and any artifact decision so the export can be repeated or rolled back.
Export in the right format
Export as PNG for highest quality if file size is not a concern. Export as high-quality JPEG (90-95%) if you need smaller files for web use. Avoid re-compressing an already-compressed JPEG multiple times — every save degrades quality. For illustrations with large areas of solid color, PNG produces much smaller files than JPEG and preserves sharp edges. Keep the original beside the upscale and judge the result at 100% zoom and at the final display size. Record the model, scale, format, and any artifact decision so the export can be repeated or rolled back.
Use batch processing for multiple images
If you need to upscale many images, use the batch mode in Upscayl (select a folder) or LetsEnhance (upload multiple files at once). For Topaz Gigapixel, you can queue hundreds of images and let them process overnight. Batch mode saves significant time versus processing files one at a time. Keep the original beside the upscale and judge the result at 100% zoom and at the final display size. Record the model, scale, format, and any artifact decision so the export can be repeated or rolled back.
Prepare the source and color workflow
Remove unnecessary crops and avoid repeatedly re-saving a compressed JPEG before upscaling. Check orientation, color profile, and the area that must remain accurate, such as text or a face. Make a small test with the intended model and scale, then compare it with the original. If the image is an illustration, line art, or anime-style work, use a model suited to that content rather than assuming a photo model will preserve clean edges.
Make a final-use quality decision
Open the exported image at the size people will actually see and at 100% zoom. Look for halos, repeated textures, invented letters, plastic-looking skin, and smoothed edges. If artifacts matter more than extra pixels, return to a lower scale or a different model. Export PNG when exact edges or transparency matter and high-quality JPEG when a smaller photographic file is appropriate. Keep the source and the approved settings with the project.
Recommended Tools


